After some grueling days of being couped up in my bathroom, I have finally completed the transformation.
Lets start from the top.
The Room
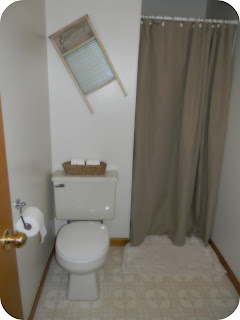
The second storey bathroom is approximately 55"W x 72"L plus the small stall shower. The bathroom is 21 years old and was part of the addition that was added to the old farmhouse. Lets take yet another look at the bathroom...
The bathroom before didn't quite work, needless to say, it was tired. The walls were a faded dark pink, new toilet paper and towel hardware was needed, and the floor was a more traditonal print that didn't match what what was going on above it. It needed a new face.
The Plan and Inspiration
The plan for this room was to give it an updated look with the use of paint and other accessories. Here's what was on the to-do list:
What was needed
The Task
The prep work for any paint job, for me at least, is the most work. I wanted to have this job done in two days but the prep work put me behind. I had to spackle some areas of the wall and it took longer to dry which created a hold on production. Once that was dry though, the primer went on in two coats the same day. The next day I sanded the walls, vacuumed the dust out, and got right to the paint. Another two coats of paint went on and I left it for another couple of days for it to dry before I did any drilling. A couple days later I put the new hardware up, and accessorized.
The Finished Product
Here it is completed:


Lessons Learned
Thanks!
Lets start from the top.
The Room
The second storey bathroom is approximately 55"W x 72"L plus the small stall shower. The bathroom is 21 years old and was part of the addition that was added to the old farmhouse. Lets take yet another look at the bathroom...
 |
| ...and moving on... |
The Plan and Inspiration
The plan for this room was to give it an updated look with the use of paint and other accessories. Here's what was on the to-do list:
- paint the walls
- change the toilet paper and towel hardware
- accessorize
What was needed
- Two quarts of primer
- One gallon of kitchen and bath paint
- Rollers, brushes, and trays
- Drop sheets/ newspapers
- Spackle and putty-knife
- Drill, anchors, and screws
The Task
The prep work for any paint job, for me at least, is the most work. I wanted to have this job done in two days but the prep work put me behind. I had to spackle some areas of the wall and it took longer to dry which created a hold on production. Once that was dry though, the primer went on in two coats the same day. The next day I sanded the walls, vacuumed the dust out, and got right to the paint. Another two coats of paint went on and I left it for another couple of days for it to dry before I did any drilling. A couple days later I put the new hardware up, and accessorized.
The Finished Product
Here it is completed:


Lessons Learned
- Like I said before, prep work is the most important and don't take any shortcuts during this step. More thorough prep work in a bathroom determines how well it will wear against moisture and how well the finished product will look.
- If you ever plan a full reno of your bathroom on a larger budget, opt for plaster. Plaster is more expensive but it stands up so much better against moisture compared to drywall.
Thanks!
I love the way it turned out. The colour scheme, so light and airy. I don't see the greeneries yet. You still have to do the ledge right? Also, take pics of the hardwares, curious to see which ones you picked. Awesome job girl!
ReplyDelete