The Find
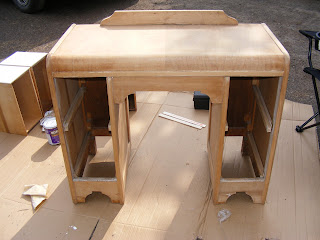
While garage saling during the summer, I came across a great find; a vanity for $5! It was an older style 4 drawer vanity that originally had a veneer on it but, luckily, it was already stripped off before I got to it. It had little metal wheels, that were not attached, and gold coloured handles. A stamp placed on the inside of the drawer indicated that it was made in Montreal by a company named 'Gelco'. The vanity was without a mirror but I had picked a mirror up the month before that seemed to be a perfect match for eachother. The mirror was $3 also found at a garage sale. Both of these pieces were perfect for what I had in mind for them.


The Plan
I planned to paint this vanity and mirror white. White is always a quick fix and it freshens up an old piece in an instant. Not only does white lighten up a space but it adds a new neutral to any setting, being it suits the style. The white that was going to be used was a generic white so the paint didn't need to be tinted. The handles also had to be changed so I decided that they needed a fresh coat of paint in a chrome finish. When I am done and if it goes well, I intend to sell it for much more than what I paid.
What was Needed
1 can of Sealer and Primer for the first coat
1 can of Arcylic Latex Paint
1 can of spray paint in chrome
1 paint roller
1 paint brush
1 electric sander
1 drop sheet
Generous amount of space

The Task
Before I started painting, I sanded the vanity in order to get all the accumulated grit off from the years before. The first coat of paint that had to go on was the can of sealer and primer. Two coats of this went onto pretty well. It was hot when I painted so the wait time in between coats wasn't as long as it could've been. The next day it was ready for the top coats of the latex paint. Two coats of this went on just as well as the first coats, all the time watching for paint running and since it was the same colour of white covering eachother, it was important to keep an eye out for missed spots. When the vanity was completely finished, the mirror and the handles were next. The mirror wasnt difficult, with two coats of paint, it was done in great timing. The handles were more difficult to paint than what I thought they would be. First they had to be sanded to get the gold paint off and to make a cleaner slate for the new paint. Spray paint was never my specialty and it showed. The first coat seemed to run and caused drips on the metal handles. This caused me to sand the handles to get the drips off and start over again. Before I could sand them, I had to wait til they dried completely which wasn't until the next day. This time it went on better but i still didn't enjoy the spray painting process.
Finished Product
I was quite pleased with the end results. The mirror and vanity looked as if they were always together and the handles didn't look like a personal nightmare. I listed the vanity on Kijiji and within a couple of days I had a buyer. The buyer was just as happy with the vanity as I was with my work I had done.


Lessons Learned
While garage saling during the summer, I came across a great find; a vanity for $5! It was an older style 4 drawer vanity that originally had a veneer on it but, luckily, it was already stripped off before I got to it. It had little metal wheels, that were not attached, and gold coloured handles. A stamp placed on the inside of the drawer indicated that it was made in Montreal by a company named 'Gelco'. The vanity was without a mirror but I had picked a mirror up the month before that seemed to be a perfect match for eachother. The mirror was $3 also found at a garage sale. Both of these pieces were perfect for what I had in mind for them.


The Plan
I planned to paint this vanity and mirror white. White is always a quick fix and it freshens up an old piece in an instant. Not only does white lighten up a space but it adds a new neutral to any setting, being it suits the style. The white that was going to be used was a generic white so the paint didn't need to be tinted. The handles also had to be changed so I decided that they needed a fresh coat of paint in a chrome finish. When I am done and if it goes well, I intend to sell it for much more than what I paid.
What was Needed
1 can of Sealer and Primer for the first coat
1 can of Arcylic Latex Paint
1 can of spray paint in chrome
1 paint roller
1 paint brush
1 electric sander
1 drop sheet
Generous amount of space

Before I started painting, I sanded the vanity in order to get all the accumulated grit off from the years before. The first coat of paint that had to go on was the can of sealer and primer. Two coats of this went onto pretty well. It was hot when I painted so the wait time in between coats wasn't as long as it could've been. The next day it was ready for the top coats of the latex paint. Two coats of this went on just as well as the first coats, all the time watching for paint running and since it was the same colour of white covering eachother, it was important to keep an eye out for missed spots. When the vanity was completely finished, the mirror and the handles were next. The mirror wasnt difficult, with two coats of paint, it was done in great timing. The handles were more difficult to paint than what I thought they would be. First they had to be sanded to get the gold paint off and to make a cleaner slate for the new paint. Spray paint was never my specialty and it showed. The first coat seemed to run and caused drips on the metal handles. This caused me to sand the handles to get the drips off and start over again. Before I could sand them, I had to wait til they dried completely which wasn't until the next day. This time it went on better but i still didn't enjoy the spray painting process.
Finished Product
I was quite pleased with the end results. The mirror and vanity looked as if they were always together and the handles didn't look like a personal nightmare. I listed the vanity on Kijiji and within a couple of days I had a buyer. The buyer was just as happy with the vanity as I was with my work I had done.


Lessons Learned
- Practise spray painting on another surface before you apply
- Use a roller more often than I paint brush to avoid drips
- Most Important Lesson: set a time frame for yourself. Time frames give yourself more pressure to complete the task and also with a bigger piece such as a vanity, it will take up a lot of room for a long time if it is just sitting there- inventory is the biggest expense for any business.
OMG! Good JOB Lorrie!!! Love it!! Now you're inspiring me to go to a garage sale!!
ReplyDeleteI was going to ask why didnt you just buy new hardware. but after I saw the pics they are a little bit of freaking fabulous!!! its worth it to spray paint!!!
ReplyDelete